Thursday, December 31, 2009

Penguin Treats

This amazing 3D Penguin cake was designed by Iced Gem Cakes.

The sweet little details on these cupcakes created by Blue Cupcake are simply adorable.

Just love these whimsical holiday penguins decorated by MJ Ballinger, Cake Central. Figures on the cake appear to be crafted from fondant.

Snowman Confections

This cake created by Pretty Cool Cakes, just makes you want to smile. Cake covering and snowman and tree figures are made from fondant.

Cute melting snowman cupcake was designed by Dozen Flours.
The detail on this cupcake, from the snowman's top hat to the icing snow, is simply amazing. Sweet things do come in small packages! Created by Sweet Daze.

Happy New Year!

Photo courtesy of Brenda's Dream Cakes

Have your bubbly and eat it too with this amazing bottle cake crafted by member Brenda's Dream Cakes.

A sincere thank you to our readers for a great 2009. Warmest wishes for a wonderful and exciting new year!

Tuesday, December 29, 2009

Cake Buzz

Elisa Strauss and Member Helen, Handbag Cake Workshop

It's a girl! Elisa Straus and husband introduced their best design to date, daughter Sophie Pearl. Elisa is back at Confetti Cakes and ready to demo at this weekend's NY Cake Convention. Member Lynn, Chef Toba, and Member LaTasha, Art of the Wedding Cake Demo.

Chef Toba Garrett's Introduction to Cake Decorating course at the Institute of Culinary Education in New York City will begin January 2010.
Member Shameeka and Cara Packard, Motocycle Cake Workshop.

Cara Packard, Cara-Lin Cakes, is moving her cake biz to Texas! Cara plans to rent her space in Brooklyn.

Do you have cake related news? Email your scoop to Dina, Organizer.

Think Out Of Your Cake Box!

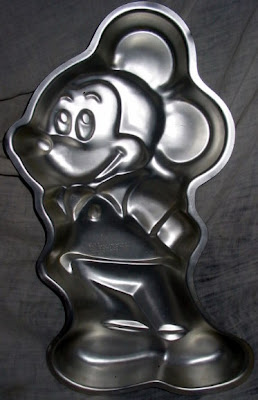
I am really not the cake decorator to whip out last minute requests. However, a dear cousin was in a real jam and asked me to bake a Mickey Mouse birthday cake for her son on Christmas eve. I couldn't make a 3D cake due to the short notice. I had a vintage Bashful Mickey Mouse pan but I dreaded using the star tip - visions of buttercream caked piping bags and carpel tunnel danced in my head. And besides, decorating the entire cake with the star tip was a bit too predictable. No, no star tip. But how could I design a unique cake within the limitations of the character pan?
Since the cake was needed on Christmas Day, I decided to turn bashful Mickey into a Santa Mickey with a bagful of toys. After crumb coating the cake, I covered the cake in fondant and used a dresden tool to highlight Mickey's head, ears, eyes, mouth, arms, legs, and shoes. Paper patterns for the shoes, pants, jacket, and ears were made directly on the metal pan. Then I rolled out the fondant and cut to fit. Mickey's jacket button and jingle bells were painted in edible gold.
Santa Mickey's bag of toys was made from red fondarific. Fondant candy canes, a teddy bear, and doll also made from fondant are peeking out of the bag. I placed large marshmallows inside the bag to give the illusion of more toys inside the bag. If I had the time, I would have added real candy canes and chocolates.

Dina
Organizer

Monday, December 28, 2009

Don't Put Your Cakes in a Corner!!

This photo is courtesy of member and instructor Chef Janet Ben -Ami, Hey! Cookie.

You can never stop learning sugar art and cake decorating, so don't put your cakes in a corner! 2010 make it your New Year's resolution to join NYC Cake Decorators at one of our fun and educational meetups. Network and foster new friendships with cakers just like you. Contact me for information.

Sweet Regards,

Dina
Organizer

Were You Naughty or Nice?

Photo courtesy of Kathia, Pink Little Cake.

Well, Christmas 2009 is past and if you were good you may have received this delicious gift box cake created by member Kathia, Pink Little Cake.

Saturday, December 26, 2009

Cup of Hot Cocoa Cake

Photo courtesy of member Chrissy, Chrissy Cakes.

Burrrrrr! A hot cup of creamy cocoa is just the thing to warm the heart on a cold winter's day. This cake was made by member ChrissyCakes. Chrissy was named as a Signature Chef for the 14th Annual Chefs Auction of Pittsburgh, a benefit for the March of Dimes. ChrissyCakes also won the People's Choice Award for best novelty cake at Pittsburgh's Premier Cake Decorating and Tasting Contest, "Let Them Eat Cake!" a benefit for The Midwife Center's Women's Health Fund.

Thursday, December 24, 2009

Happy Caking To All and To All Some Cake Cash!!

Photo courtesy of member, Stephanie.

In behalf of the NYC Cake Decorators Meetup, I would like to wish all our fans and readers a Happy Holiday! May all your dreams come true.

Sweet Regards,

Dina
Organizer


Dark Chocolate Fondant Rose Tutorial

Look Mom--no cutters! Yes, this is a large rose made entirely without cutters. I have to thank Susan, one of my students, for prompting me to show this version in class. Easy enough for beginners, the completed rose is quite large and can be used as a single flower on a cupcake, as part of a spray on a cake, or used to decorate a pastry platter.

The fondant used in creating the rose is Dark Chocolate Massa Grischuna from Albert Ulster. No water or gum glue is necessary as the fondant sticks to itself like chocolate modeling clay. The fondant tastes delicious-- a little like a tootsie roll.
The total weight of the massa is approximately 82 grams. To make the rose base, remove approximately 19 grams of dark chocolate fondant and roll into a ball.

Cup the ball in your left palm and using two fingers on your right hand, roll the ball in your palm while applying pressure on one side of the ball until it resembles a teardrop or cone shape as in the above photo.
Petals: make 9 balls approximately 7 grams each for the chocolate rose petals. Keep the fondant covered with plastic wrap as you work to prevent the fondant from drying out.
Forming petals: Take a chocolate ball in your left hand and using two fingers on your right hand, roll the ball in your palm, while applying pressure to one end of the ball until it resembles a teardrop or cone shape. Now flatten the wide end of the petal with your fingers. Pick up the petal between your thumb and pointer finger, and press the wide edge of the petal as thin as possible. The thinned wide end is the top of the petal and the tapered end is the bottom of the petal.
Center Petal: Prepare the petal as above and wrap the center petal around the rose base. At this point, your rose should look similar to this one.
First Row: Wrap 3 petals around the center petal. Prepare each petal as above. The petals in the first row are positioned slightly higher than the center petal. (Most beginners make the mistake of placing the first row of petals below the center petal).
Each petal thereafter is placed just inside the last petal, so that it slightly overlaps the last petal. When the third petal is placed, you can attach both sides of the third petal to the base.
This is how your rose should look when the first row of 3 petals is completed. See how the wide edge of the petals have been thinned?
Second Row: Wrap 5 petals around the first row. Position the second row of petals slightly lower than the first row. Prepare each petal as before, placing each petal inside the last so it slightly overlaps. When the second row is completed, you can further shape each petal so it looks as life-like as possible. After the petals are shaped, you can take a sharp knife and cut off some of the base if necessary. Since this rose is quite large, I think 5 petals is good enough. However, you can wrap a third row of 7 petals if you like. Place the third row slightly lower than the second row and prepare each petal according to the previous instructions.

Let me know how your roses came out. I am thinking of posting more tutorials on how to make various flowers without cutters. A great way to save money while having fun.

Sweet Regards,

Dina
Organizer

Wednesday, December 23, 2009

Yummy Gingerbread Cookies

Christmas doesn't seem like Christmas unless there is the smell of gingerbread in the house. This easy gingerbread recipe makes about 2 1/2 dozen cookies. While your cookies are baking in the oven, enjoy the Dancing Gingerbread Cookie compliments of SugarVeil. Thanks Emily G. for giving me a heads up!


Peanut Butter Gingerbread Cookies

5 cups all-purpose flour
3/4 cup creamy peanut butter
1 1/2 teaspoons ground cinnamon
1 cup packed brown sugar
1 teaspoon baking soda
1 cup KARO dark corn syrup
1/2 teaspoon ground ginger
2 eggs
1/4 teaspoon salt
3/4 cup softened margarine

In a large bowl, combine flour, cinnamon, baking soda, ginger and salt. In another large bowl, beat margarine and peanut butter until well blended. Add brown sugar, corn syrup and eggs; beat until smooth. Gradually beat in 2 cups of the dry ingredients. With a wooden spoon, beat in the remaining dry ingredients, 1 cup at a time, until well blended. Divide the dough into thirds. Wrap in plastic wrap; chill until firm, at least 1 hour.

Preheat the oven to 300 degrees F. Roll out the dough, one third at a time, to 1/8-inch thickness on a lightly floured surface. Cut out with an oversize gingerbread man and woman cutters. Place 2 inches apart on an ungreased cookie sheet. Bake 10 to 12 minutes or until lightly browned. Remove to wire racks to cool completely. Pipe frosting on cookies with No. 3 tip to make eyes and buttons.

Royal Icing Recipe Using Meringue Powder

4 cups confectioner's 10X powdered sugar
3 tablespoons meringue powder (purchase at a cake decorating supply store)
1/2 teaspoon vanilla extract
3/4 cup warm water

Mix dry ingredients together. Add liquid ingredients and mix on low speed until combined. Mix on medium speed for approximately 4 minutes or until peaks form. Add up to 2 teaspoons of warm water per cup of icing to thin icing for piping and flooding cookies.

Enjoy!

Dina


Saturday, December 19, 2009

'Tis the Season to Give

Photo Courtesy of member Stephanie Haver

This season why not bake and decorate delicious and amazing cakes, cookies, and cupcakes for a cause: Free Cakes for Kids, Iron Cupcake Challenge -Moorestown, and Great American Bake Sale are three organizations who can use your help. Live in New York City? Contact Elaine Gil, owner Bubbles Playhouse and ask her about her charity organization Kids Gone Giving. Every month Elaine does a good deed for children's charities in Staten Island.


Lynn's Igloo Cake's a Smashing Success!!

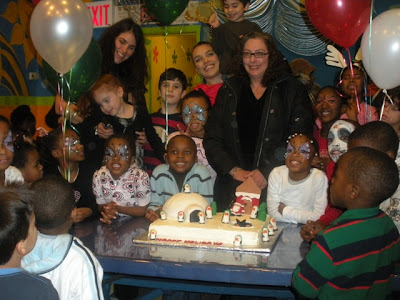
Photo courtesy of member, Lynn Carbone


Bubbles Playhouse's December 17th bash for the Pediatric Cancer patients from Staten Island Hospital was a huge success!!!!!!!! Santa and his elves visited the children and there was dancing, caroling, and facepainting. Member Lynn Carbone, Lynn's Custom Cakes, donated a delicious igloo and penguin cake that stole the show!


Wednesday, December 16, 2009

Birthday Cake Contest!

Photo courtesy of member Aldana

Send Taste of Home Magazine your favorite birthday cake recipe and you could win $2,500! Deadline is December 30, 2009. Get the scoop at Taste of Home's website.

Monday, December 7, 2009

Kid's Cake Idea!

This photo is courtesy of member Silvina Barboza.

Members had a blast at our 3D Oscar the Grouch cake workshop with Chef Janet Ben-Ami on December 5, 2009. Chef Janet, owner of Hey!Cookie, in Long Island, New York is an expert cake sculptor and an excellent teacher. Besides cake carving and working with an armature, members practiced airbrushing. The result is this amazing cake sculpted by member Silvina Barboza.

Sunday, December 6, 2009

Win "Cake Styling" by Nicholas Lodge!

Calling all cupcake, cookie and cake decorators, bakers, and sugar artists!! Dreaming of that special cake gadget, mold, pan, class, or gift certificate for the holidays? NYC Cake Decorators Meetup wants to know!!

Leave a comment on this post and tell NYC Cake Decorators what cupcake, cookie, cake decorating or sugar art stocking stuffer YOU crave this year and you may win a copy of Cake Styling by Nicholas Lodge. Contest ends at 11:59pm EST on December 24, 2009. Winner will be announced on January 1, 2010. Good Luck and Happy Holidays!

CONGRATULATIONS TO SUGAR COVE!
Sugar Cove was randomly selected as the winner of this contest and a copy of "Cake Styling" will be mailed to her on January 5th!

Picture Perfect Holiday Cake!

This lovely poinsettia and roses cake was created by Karen, our New Hampshire member. Deep red poinsettia adorned cakes are picture perfect for the holidays!

December 2009 Cake Of The Month


Member Edi Rosado's Nativity cake is a sweet reminder of the reason for the season. Edi is a self-taught cake decorator. The figurine cake toppers of Mary and Jesus are totally edible and made by hand.